
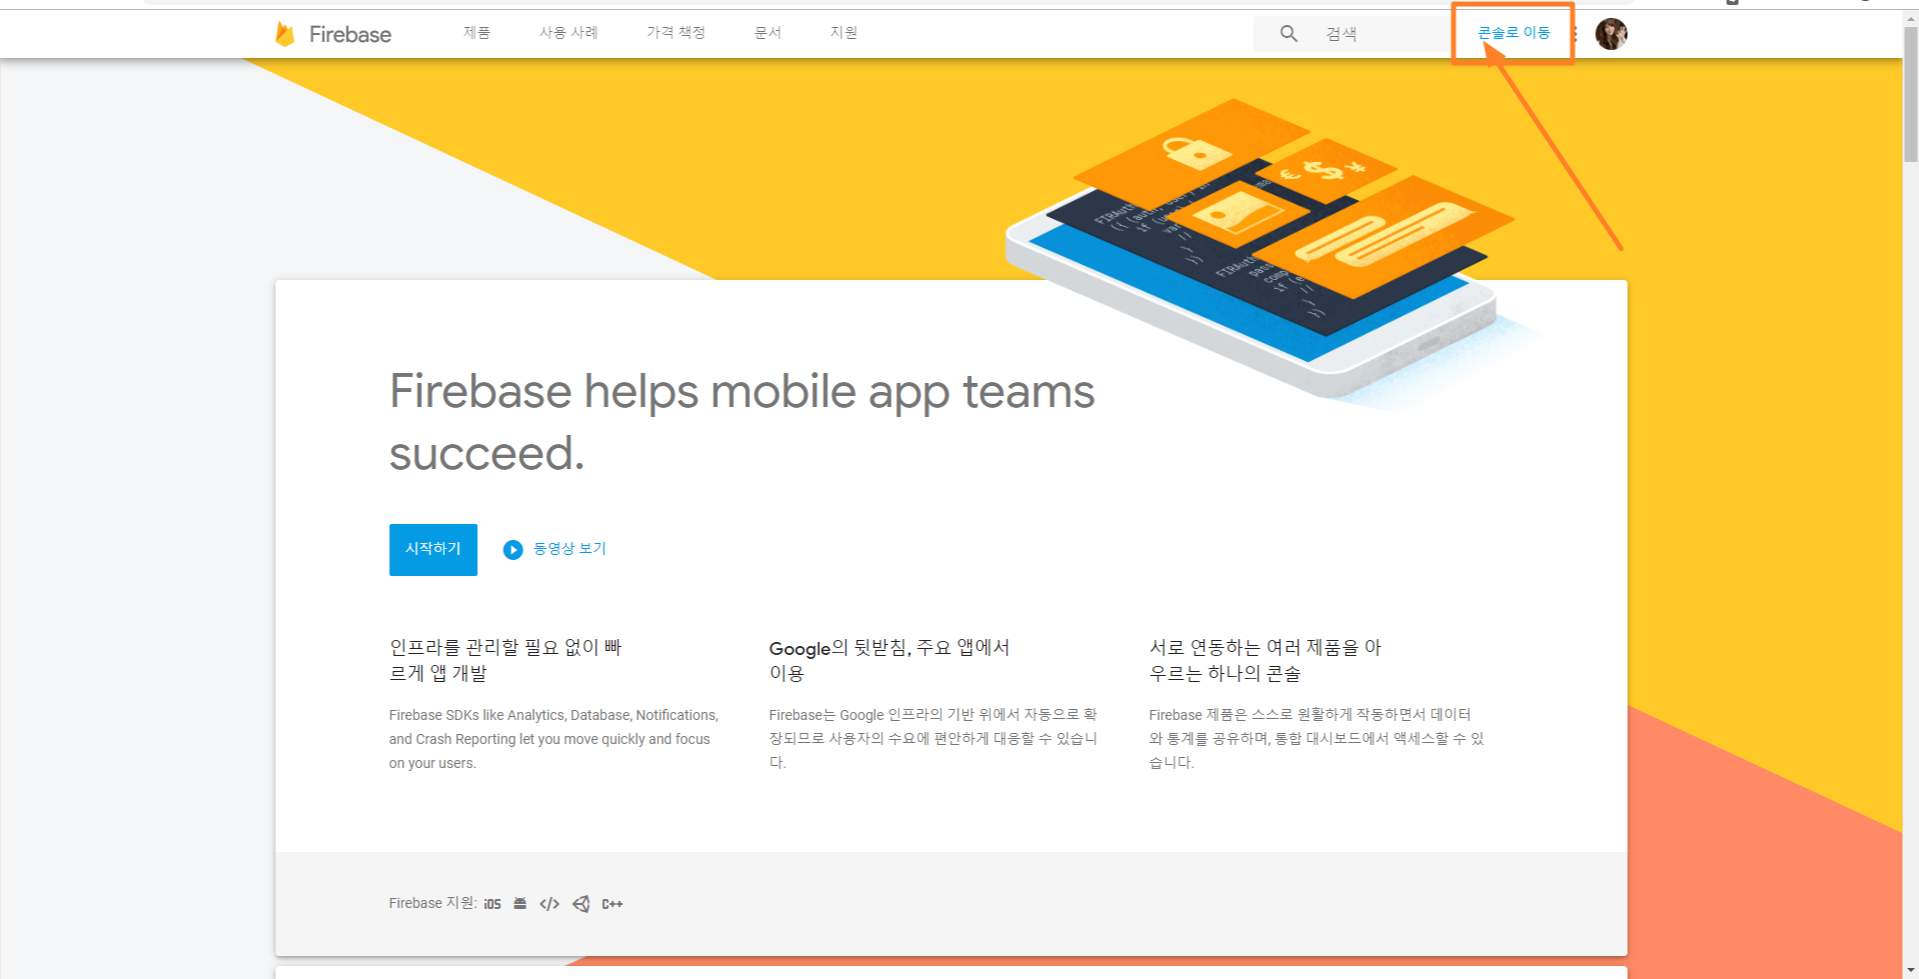
1. Firebase에 앱 등록
https://firebase.google.com/ 에 접속해서 콘솔로 이동
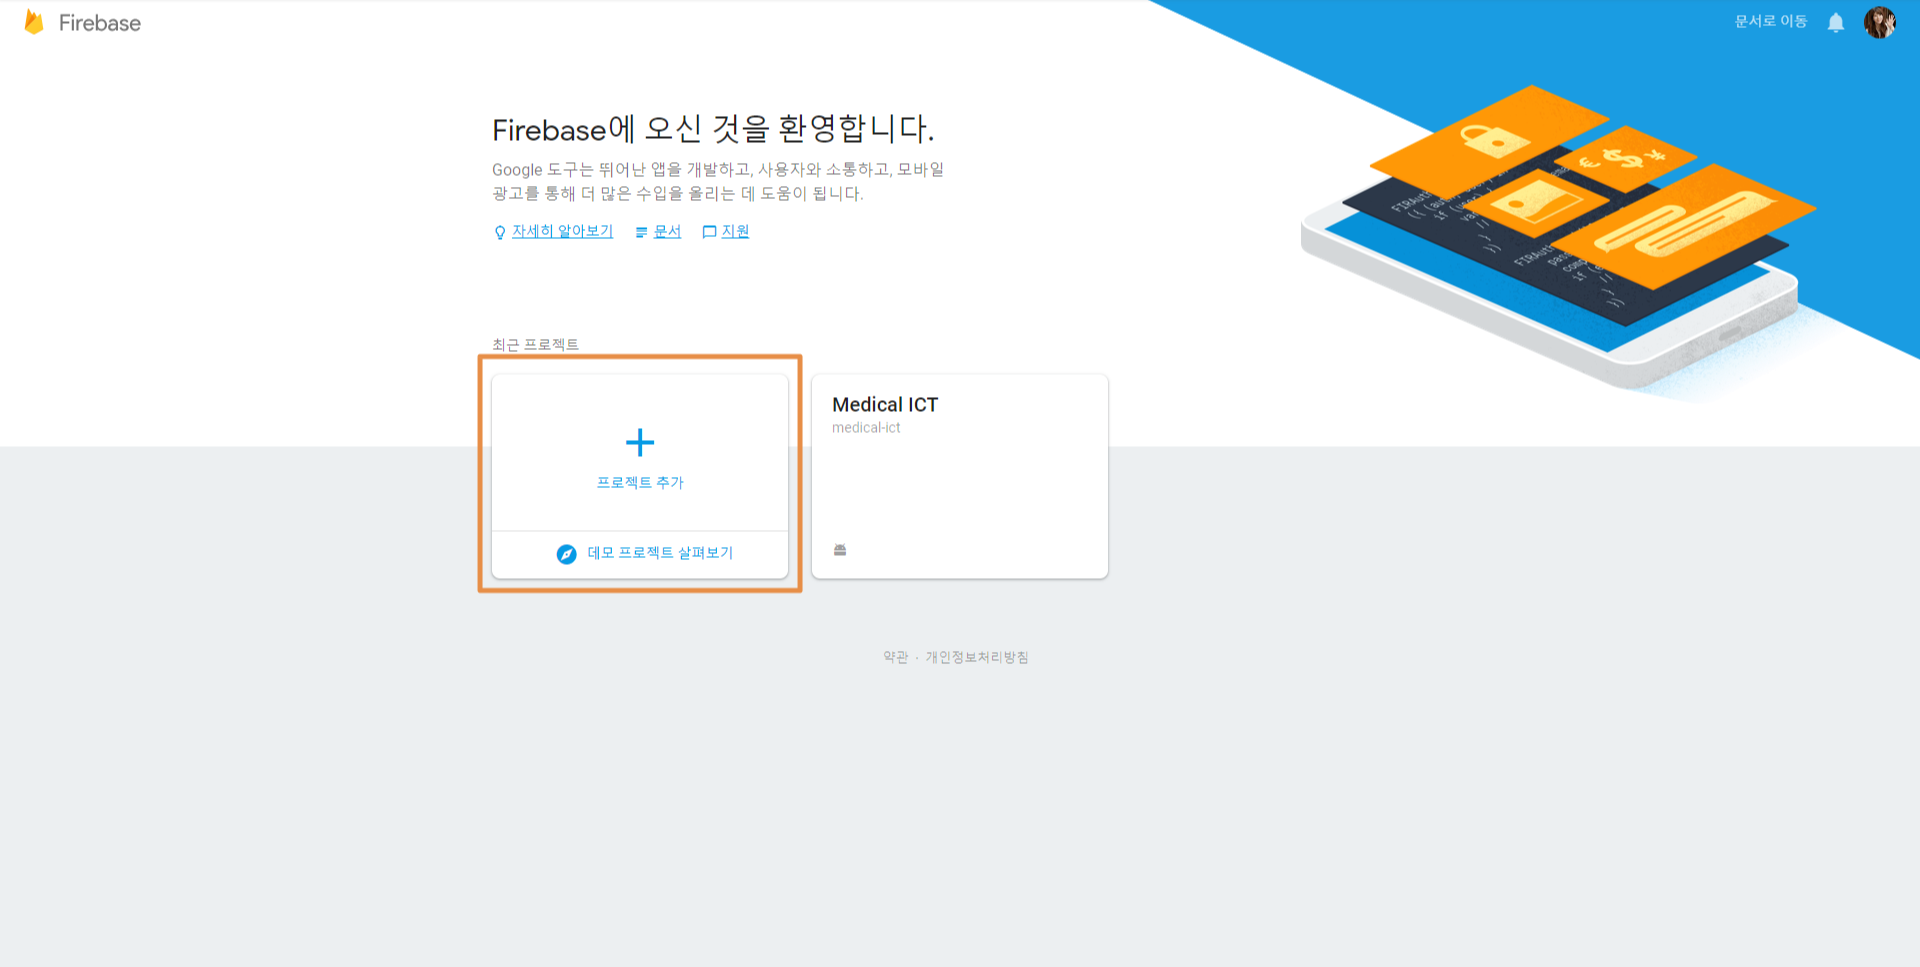
프로젝트 추가 버튼 클릭
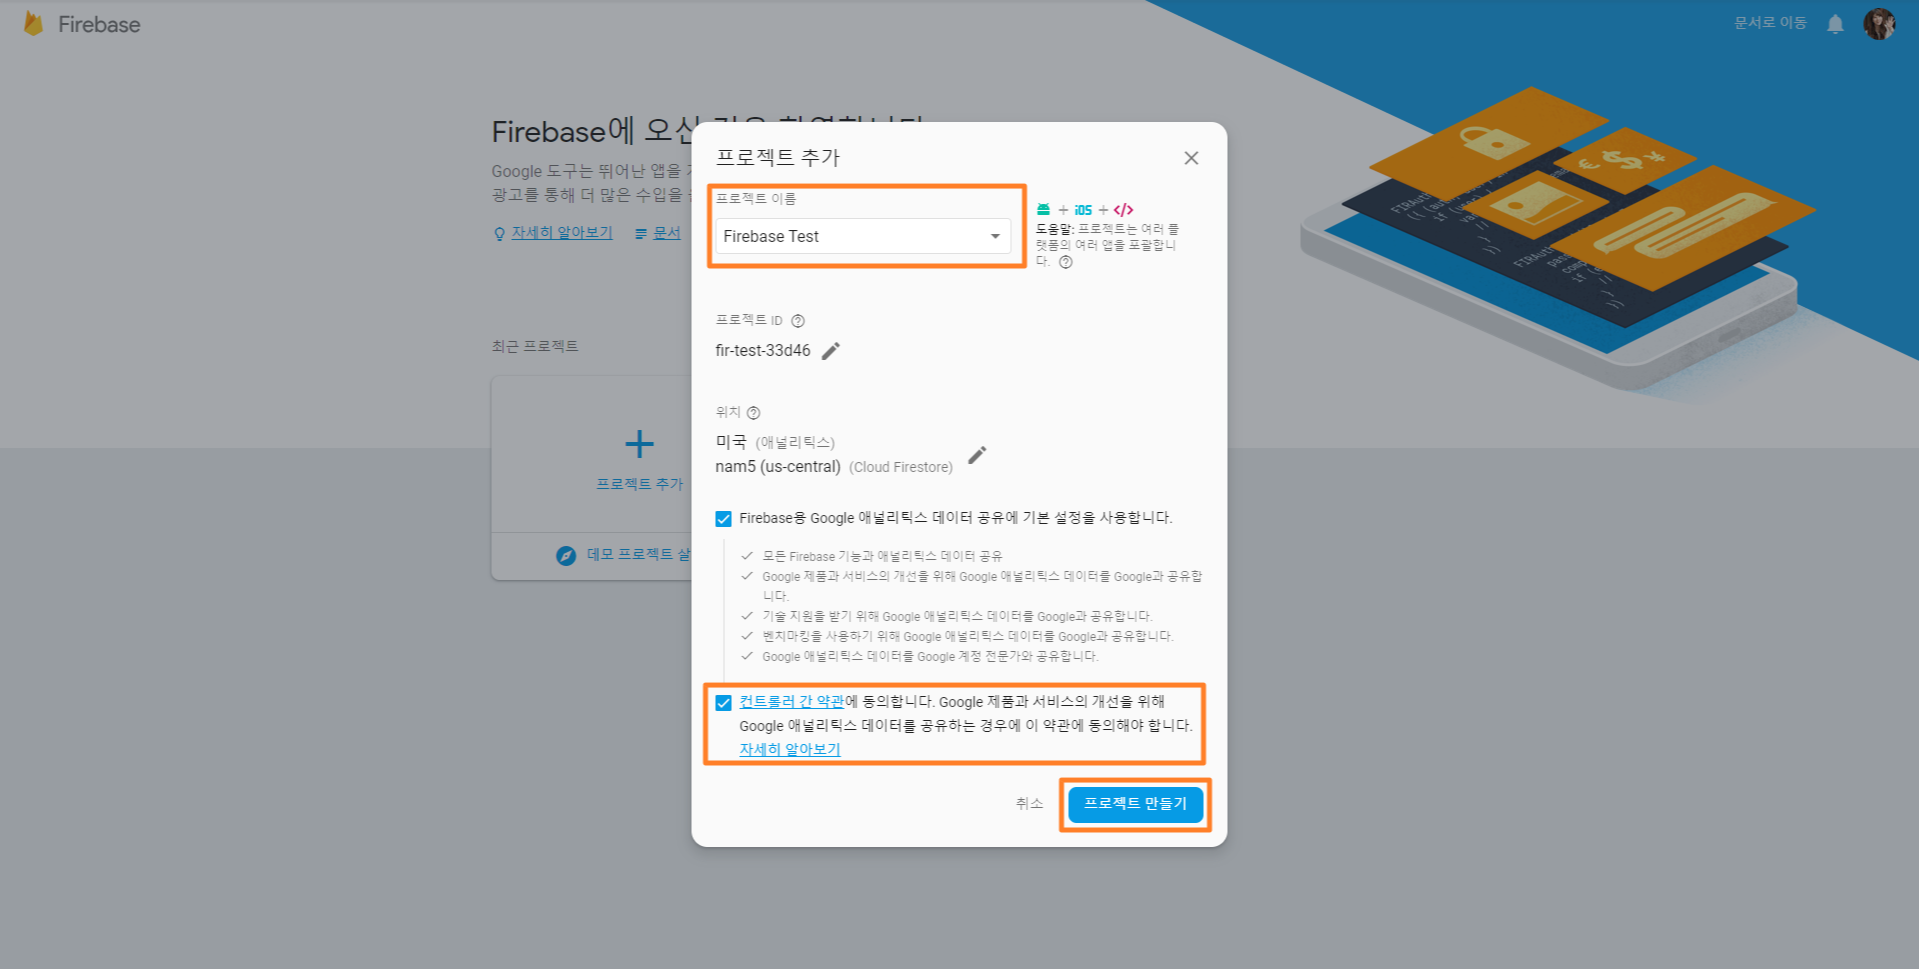
프로젝트 이름 작성 및 약관 동의 후 프로젝트 만들기 클릭
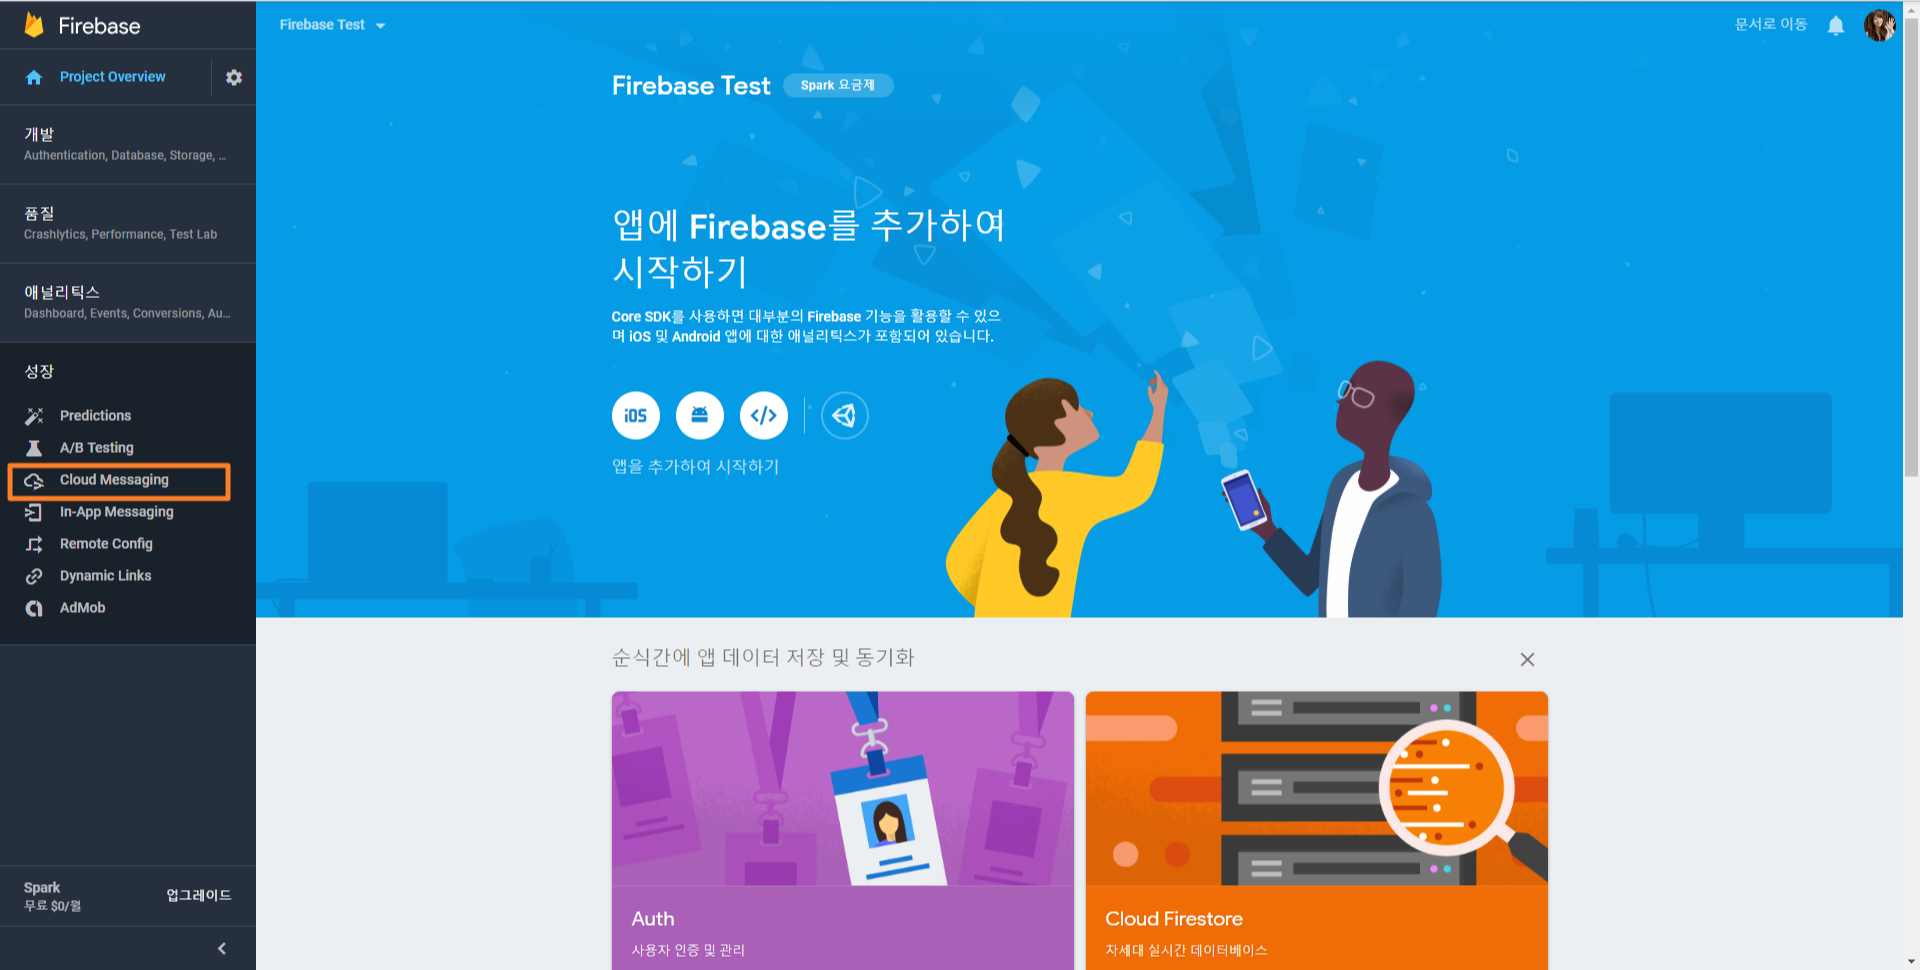
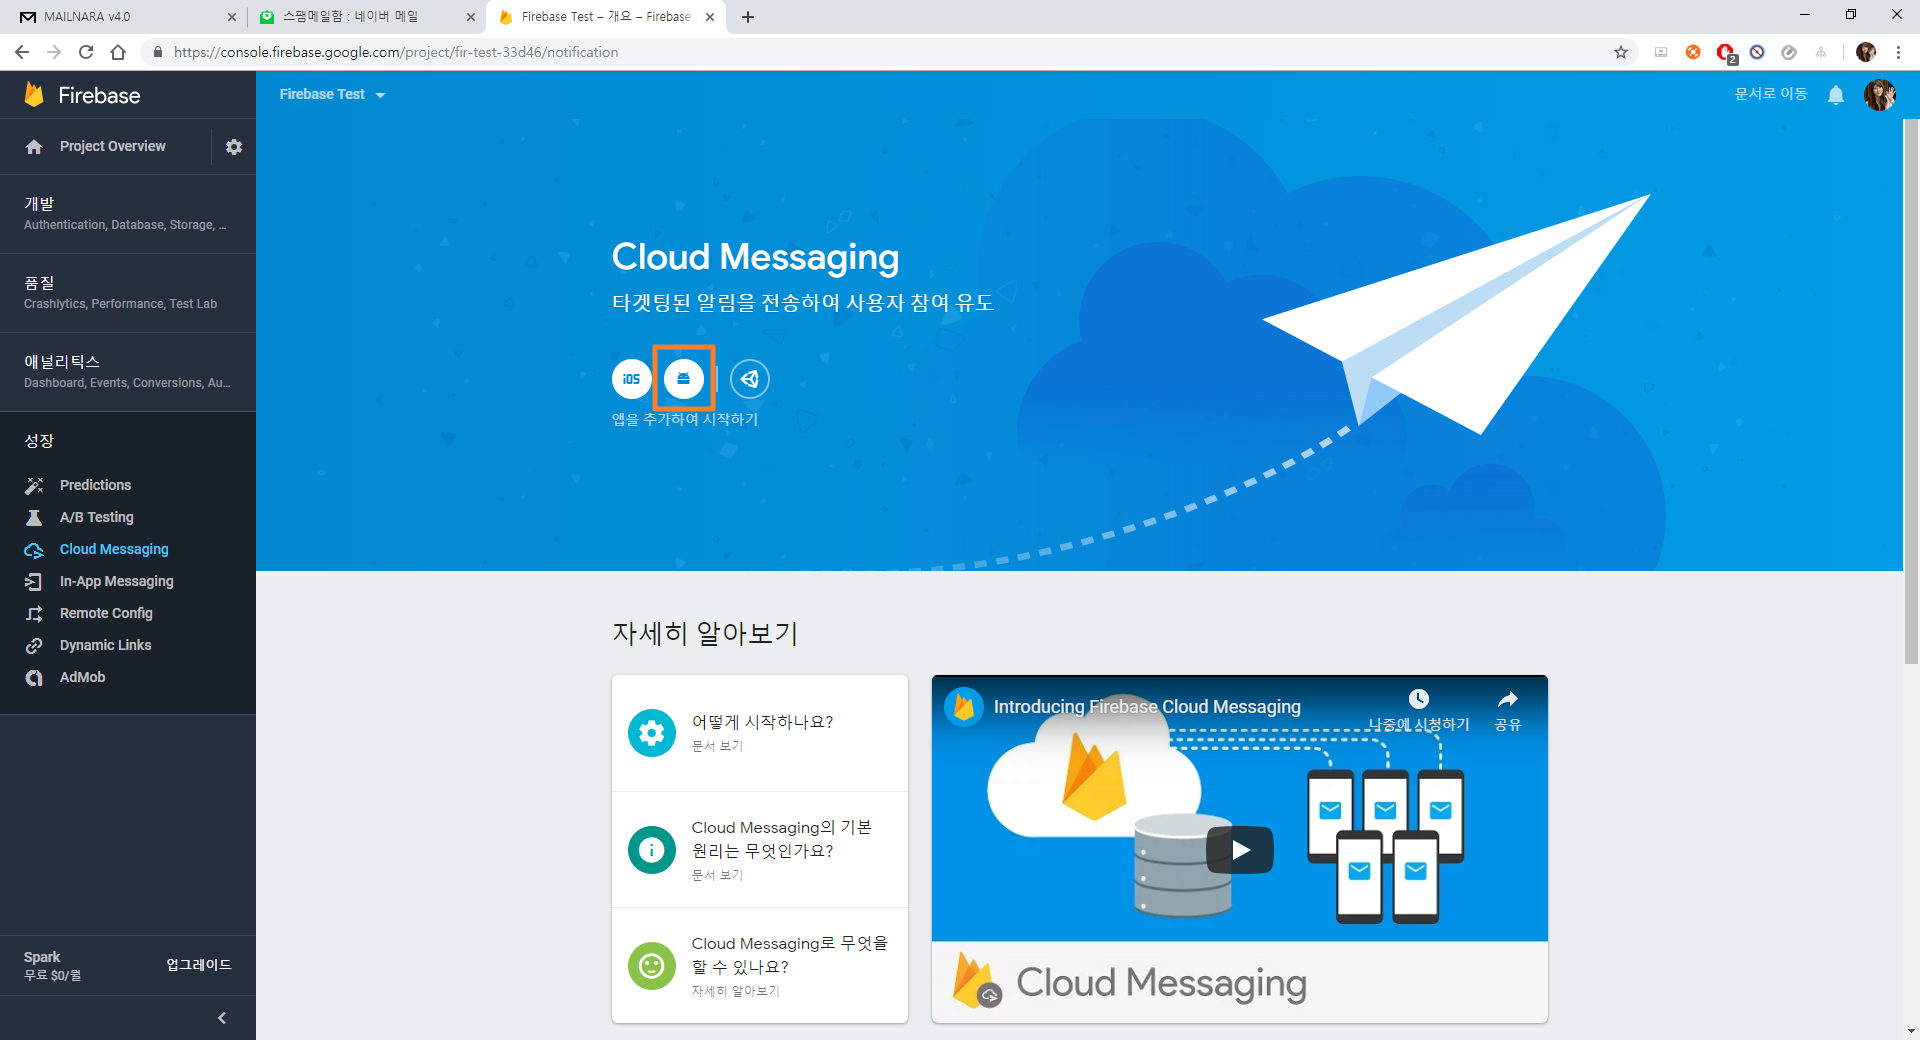
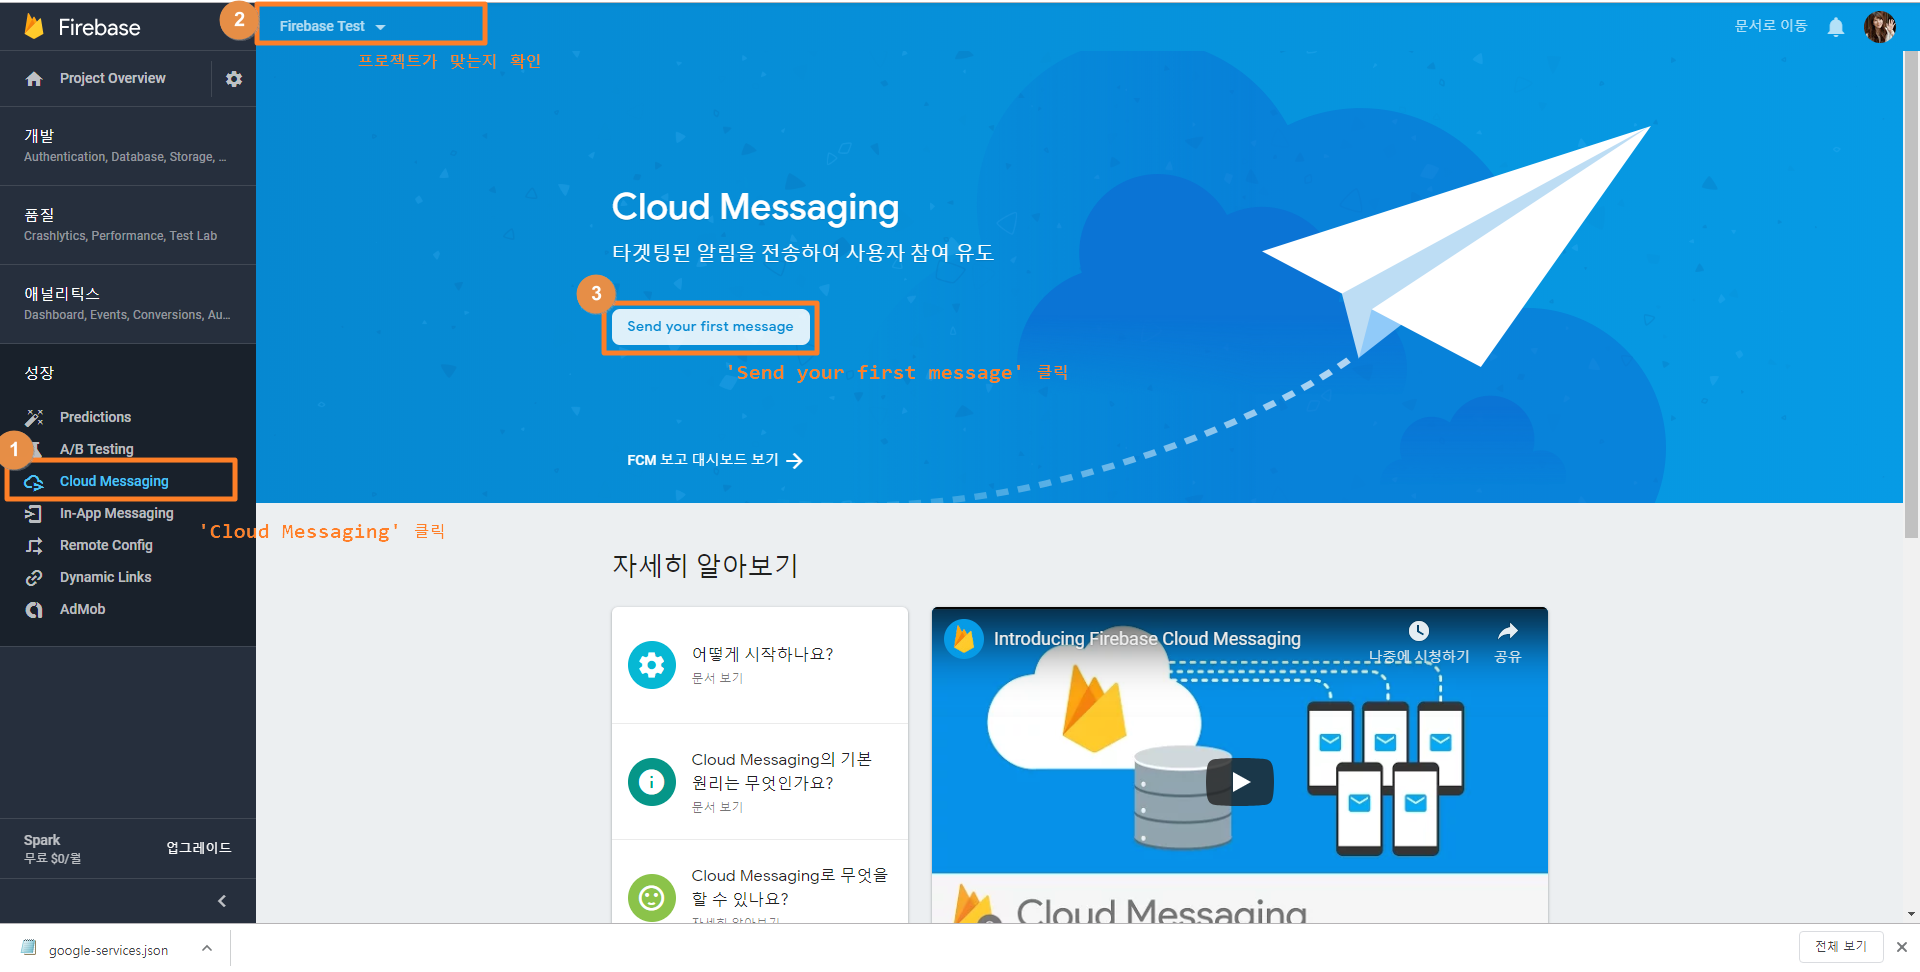
콘솔화면에서 'Cloud Messaging' 선택
안드로이드 선택 (※ Firebase는 iOS도 지원한다.)
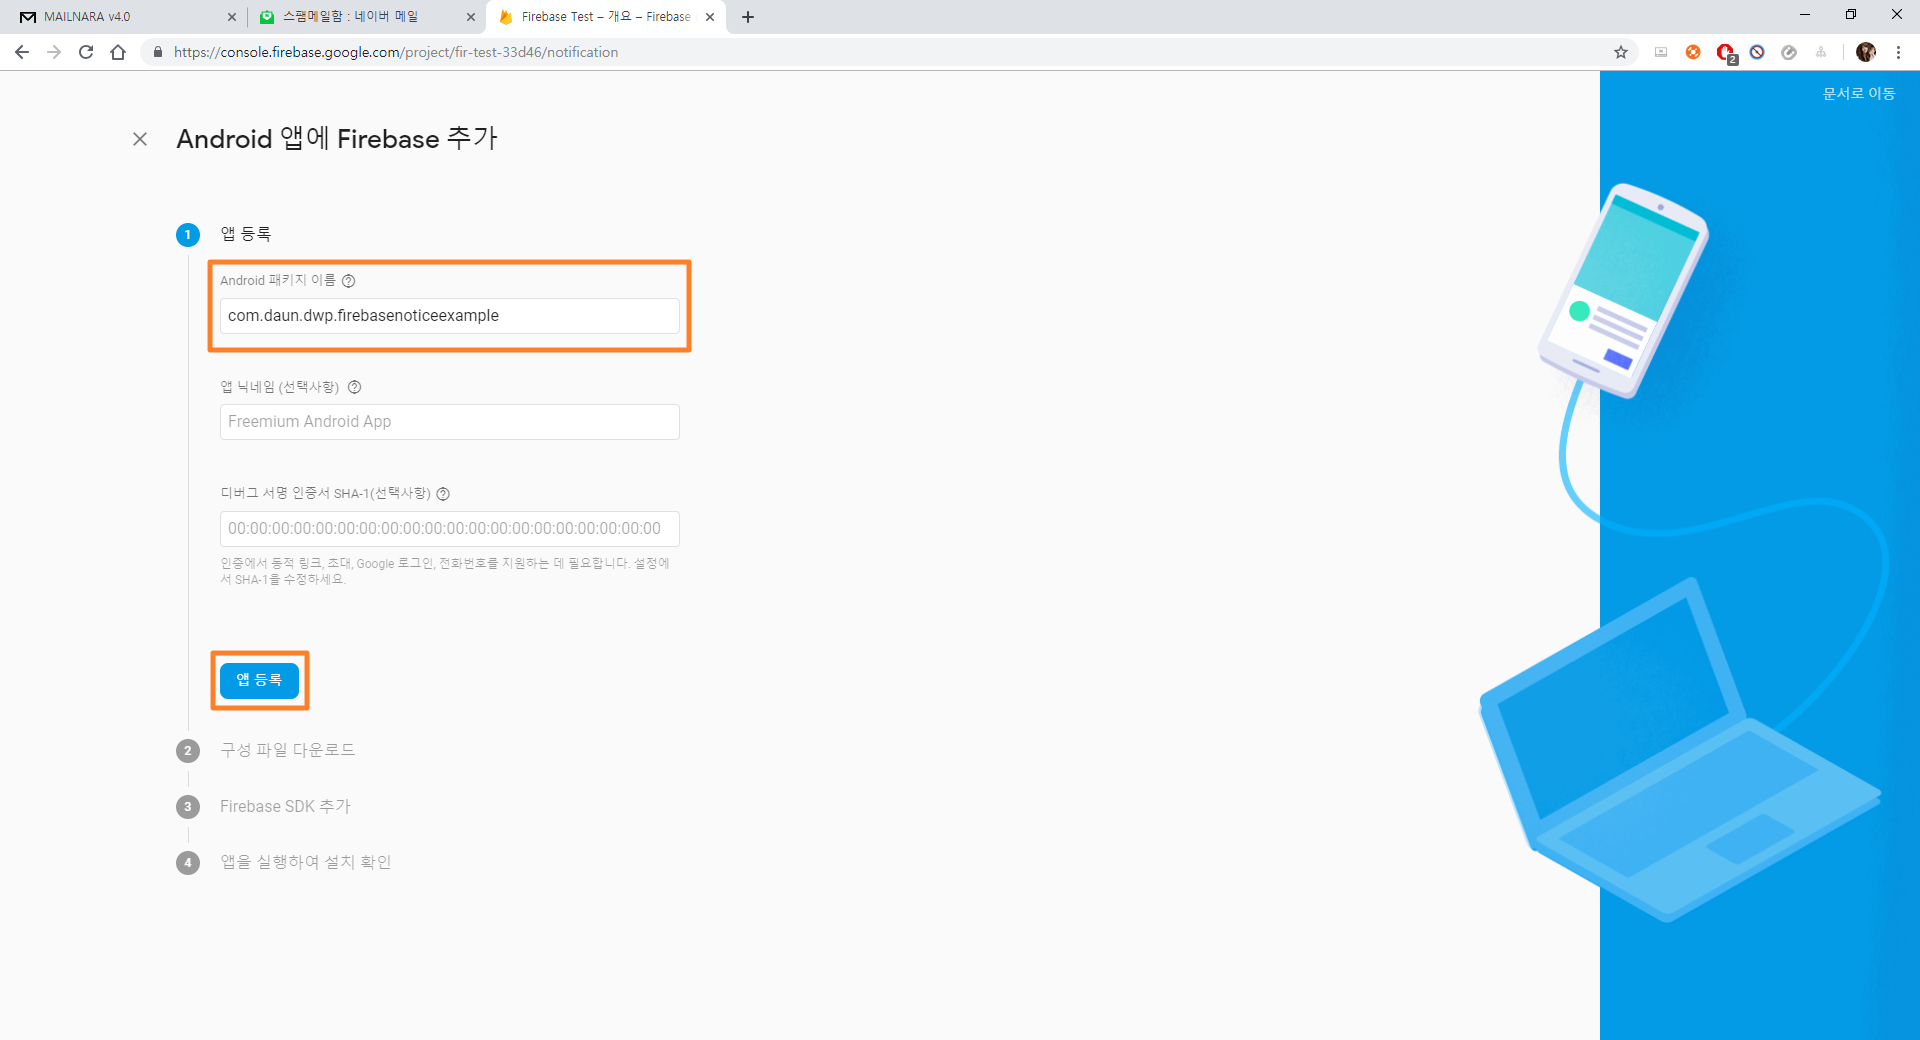
생성한 프로젝트 패키지 이름을 넣고 앱등록 버튼을 선택
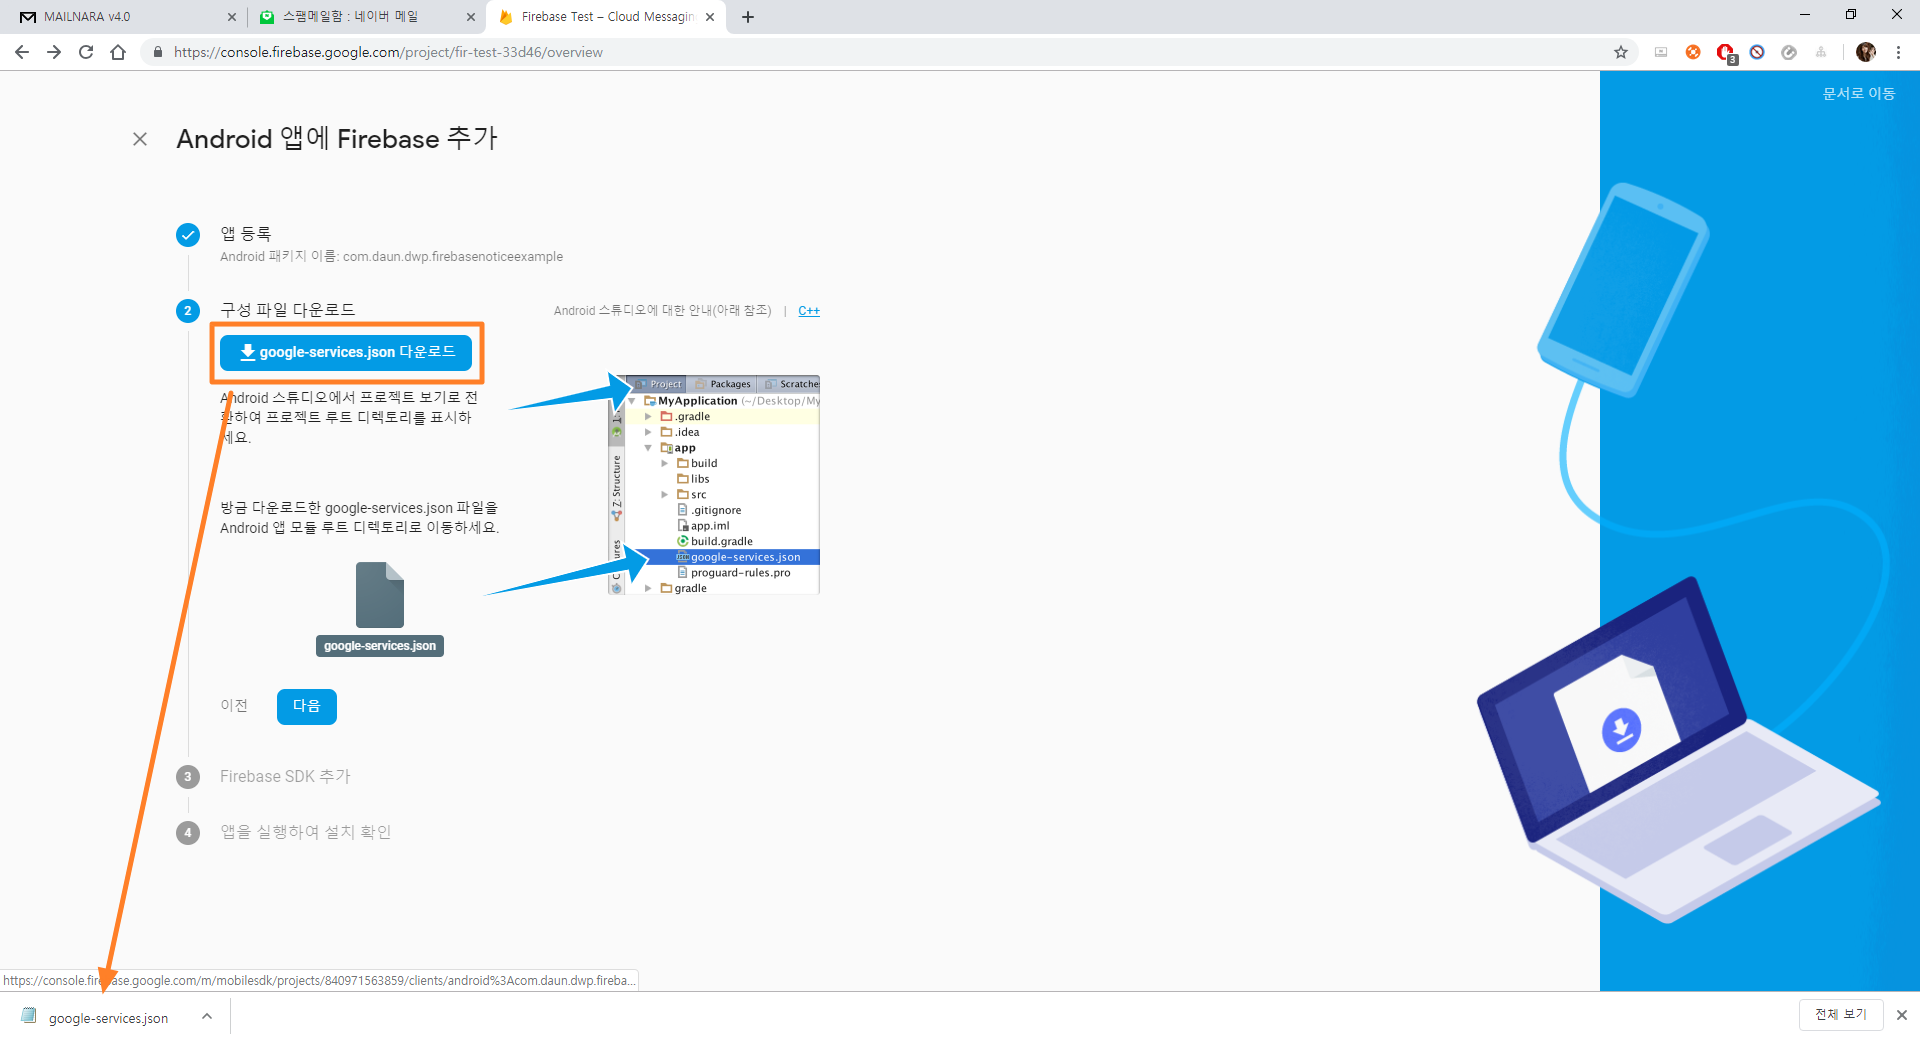
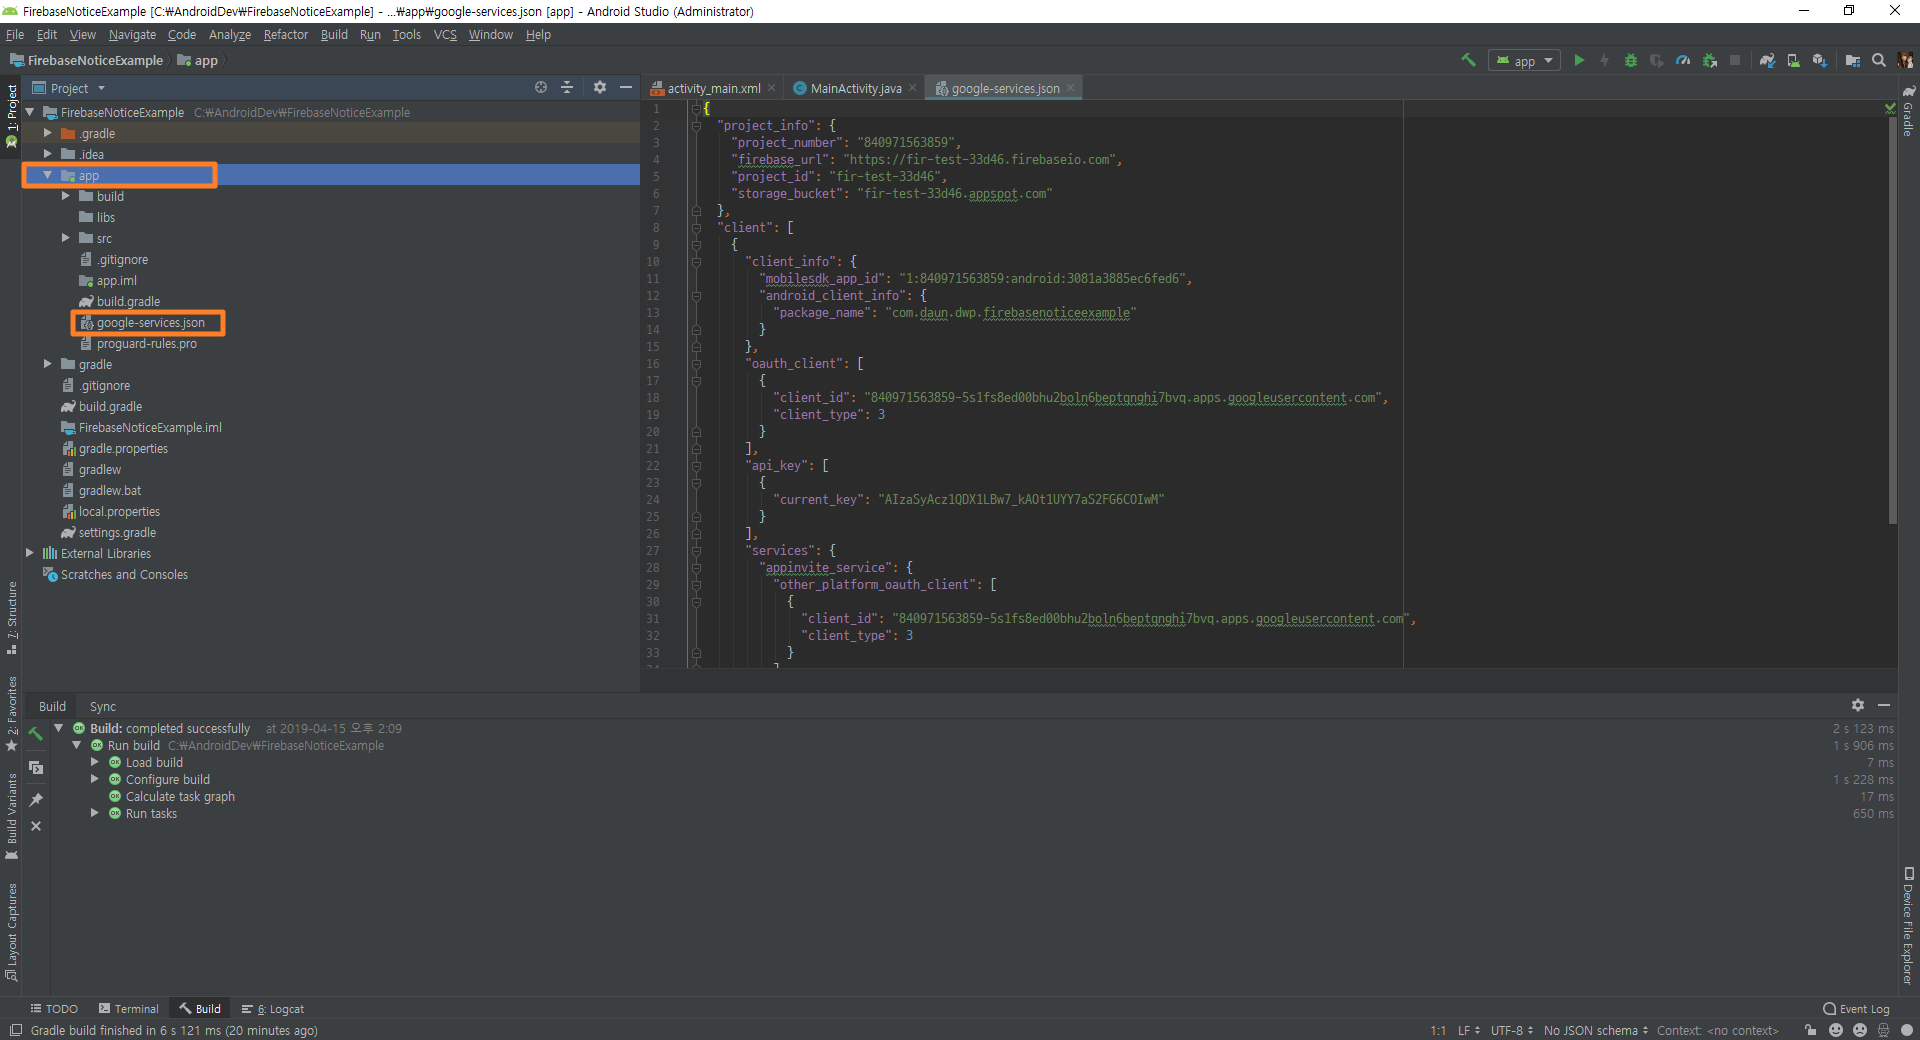
google-services.json 파일 다운로드 후 app 프로젝트 아래에 붙여넣기
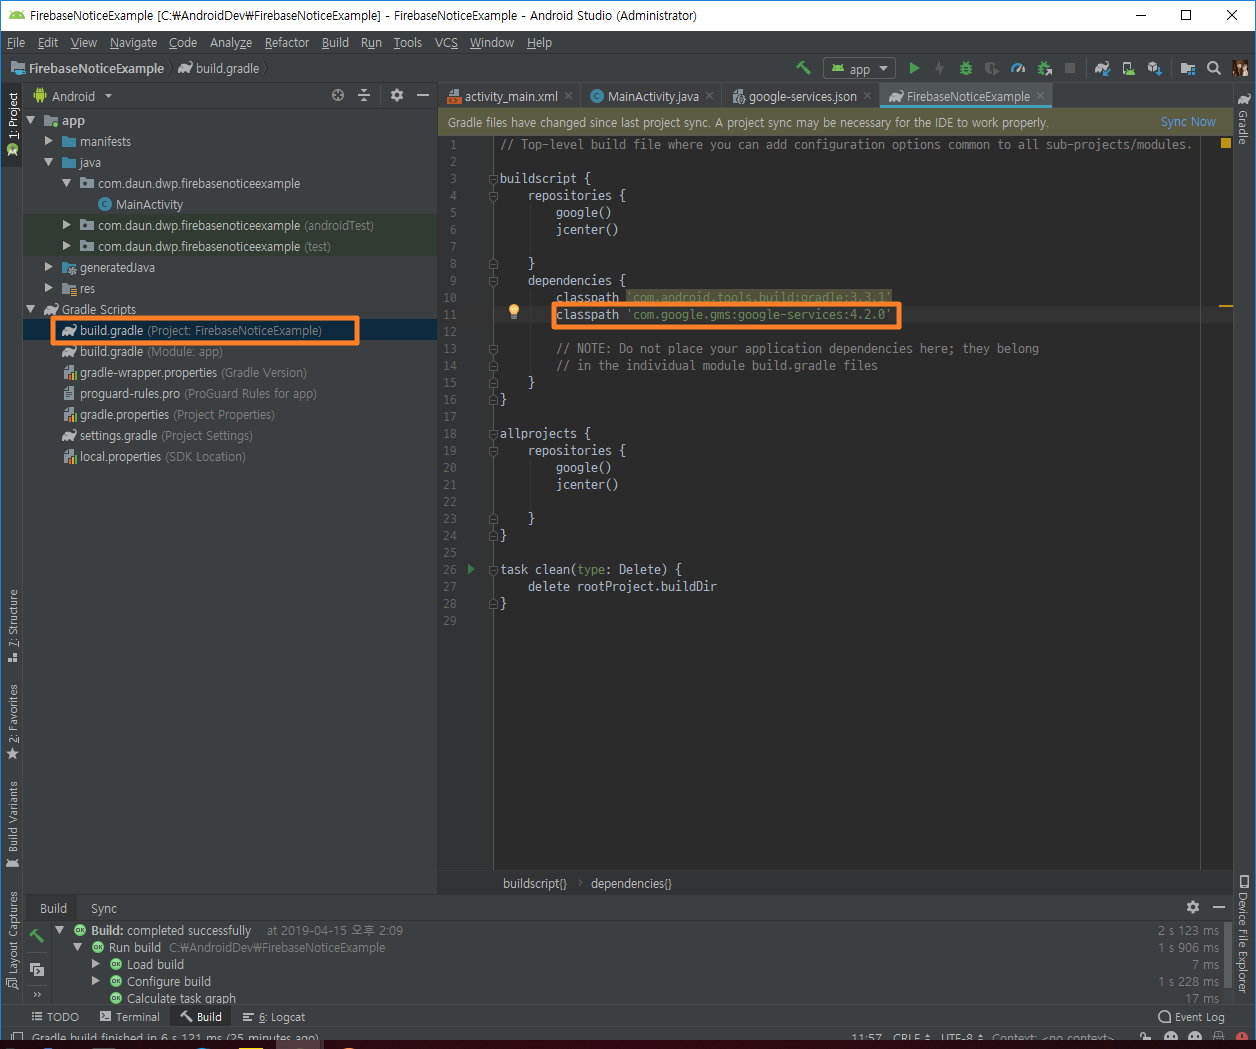
build.gradle(Project: FirebaseNoticeExample) 파일 수정
classpath 'com.google.gms:google-services:4.2.0'
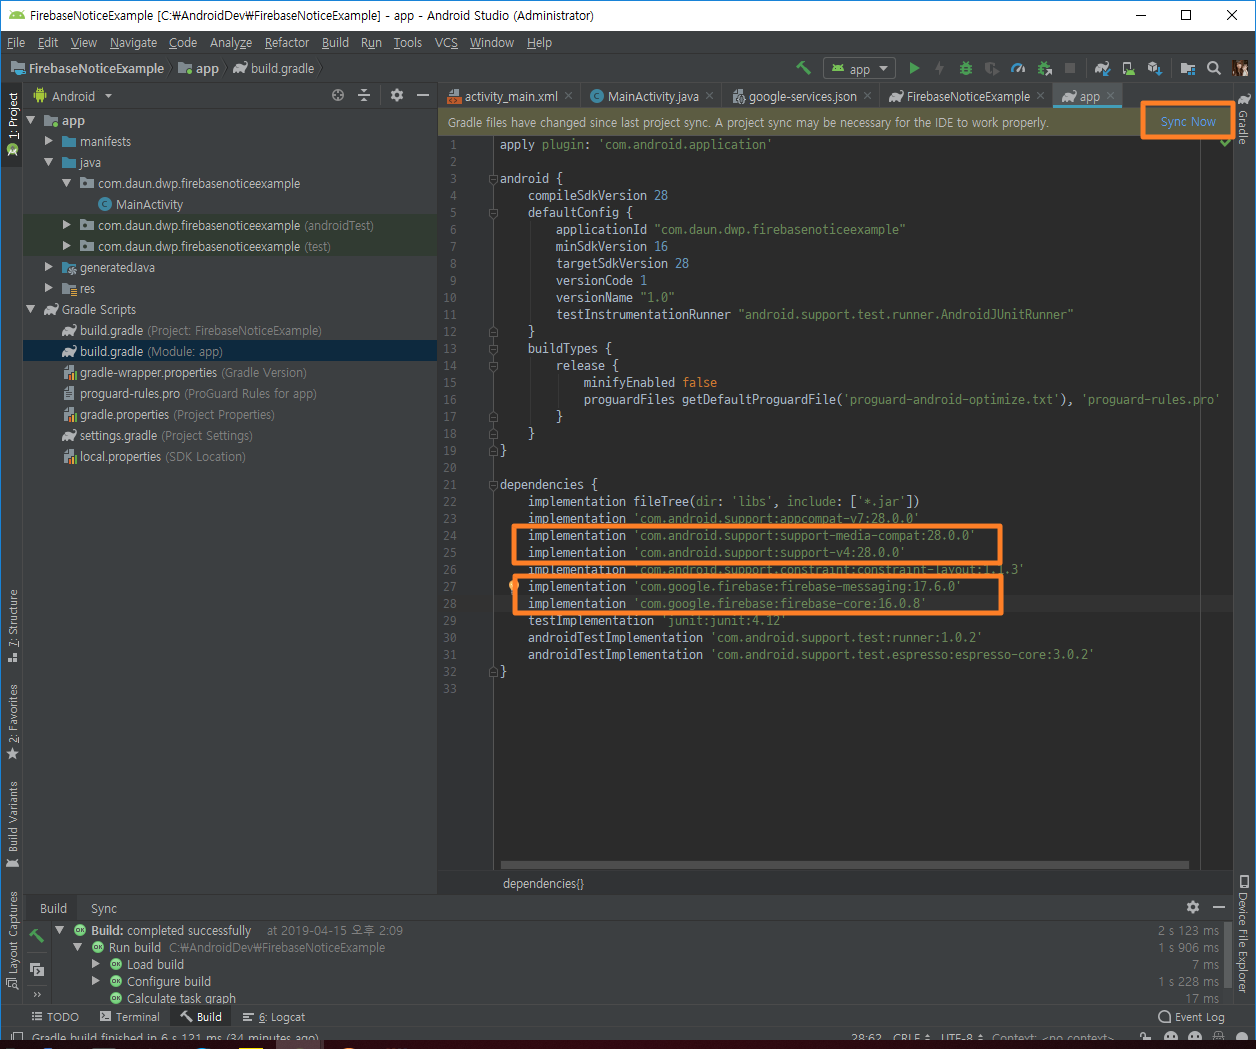
build.gradle(Module: app)
// 20-10-29 수정: AndroidX 대응 및 버전 변경
implementation "com.google.firebase:firebase-messaging:21.0.0"
implementation "com.google.firebase:firebase-core:18.0.0"
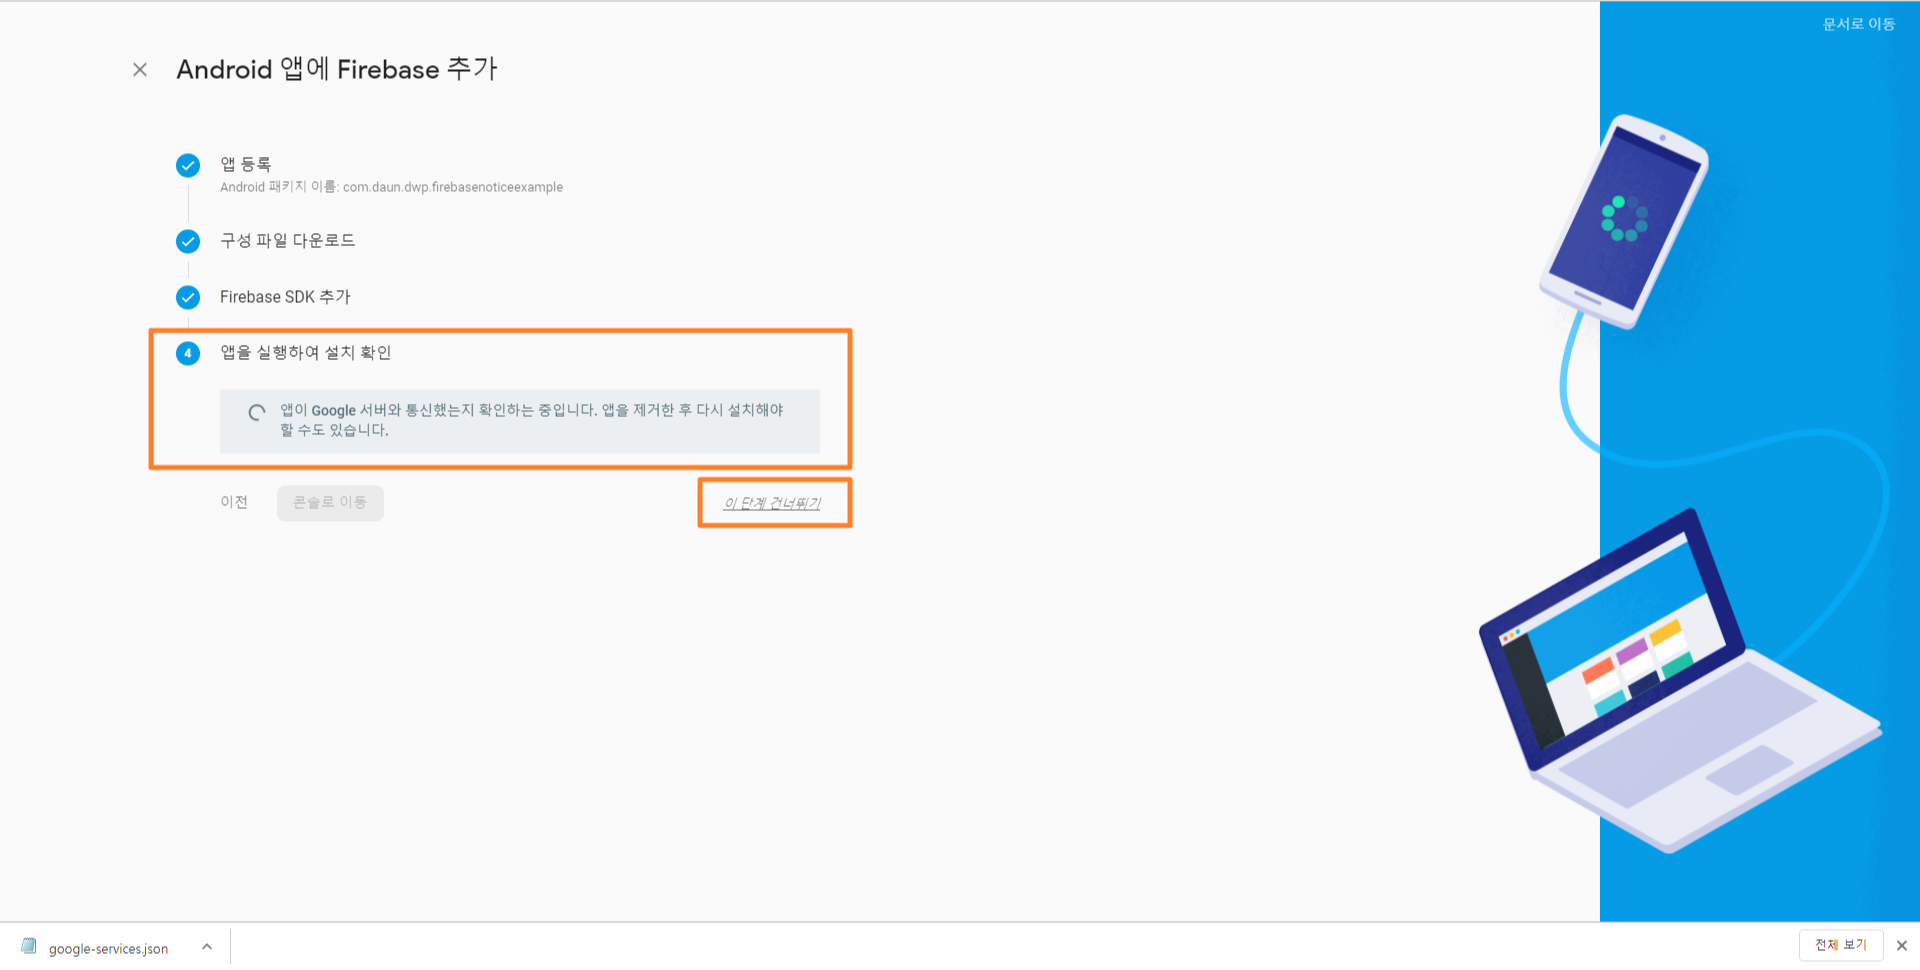
설치 확인

만약 설치확인이 되지 않더라도 과정만 제대로 따라왔으면 되기 때문에 '이 단계 건너뛰기' 선택
2. 프로젝트 생성 및 실행
안드로이드 스튜디오에서 Firebase 서버와 통신하기 위한 .java 파일 생성
MyFirebaseMessagingService.java
package com.daun.dwp.firebasenoticeexample;
import android.app.NotificationChannel;
import android.app.NotificationManager;
import android.app.PendingIntent;
import android.content.Context;
import android.content.Intent;
import android.media.RingtoneManager;
import android.net.Uri;
import android.os.Build;
import android.support.v4.app.NotificationCompat;
import android.support.v4.content.LocalBroadcastManager;
import android.text.TextUtils;
import android.util.Log;

import com.google.firebase.messaging.FirebaseMessagingService;
import com.google.firebase.messaging.RemoteMessage;

import java.util.HashMap;
import java.util.Map;

public class MyFirebaseMessagingService extends FirebaseMessagingService {
    private static final String TAG = "MyFirebaseMsgService";

    @Override
    public void onMessageReceived(RemoteMessage remoteMessage) {
        // Handle FCM Message
        Log.e(TAG, remoteMessage.getFrom());

        // Check if message contains a data payload.
        if (remoteMessage.getData().size() > 0){
            Log.e(TAG, "Message data payload: " + remoteMessage.getData());

            handleNow();
        }

        // Check if message contains a notification payload.
        if (remoteMessage.getNotification() != null){
            Log.e(TAG, "Message Notification Body: " + remoteMessage.getNotification().getBody());

            String getMessage = remoteMessage.getNotification().getBody();
            if(TextUtils.isEmpty(getMessage)) {
                Log.e(TAG, "ERR: Message data is empty...");
            } else {
                Map<String, String> mapMessage = new HashMap<>();
                assert getMessage != null;
                mapMessage.put("key", getMessage );

                // Broadcast Data Sending Test
                Intent intent = new Intent("alert_data");
                intent.putExtra("msg", getMessage);
                LocalBroadcastManager.getInstance(this).sendBroadcast(intent);
            }
        }
    }

    private void handleNow(){
        Log.d(TAG, "Short lived task is done.");
    }

    /** 새로운 토큰이 생성되는 경우 **/
    @Override
    public void onNewToken(String refreshedToken) {
        super.onNewToken(refreshedToken);
        Log.e(TAG, "Refreshed token: " + refreshedToken);
        sendRegistrationToServer(refreshedToken);
    }

    private void sendRegistrationToServer(String token) {
        Log.e(TAG, "here ! sendRegistrationToServer! token is " + token);
    }
}
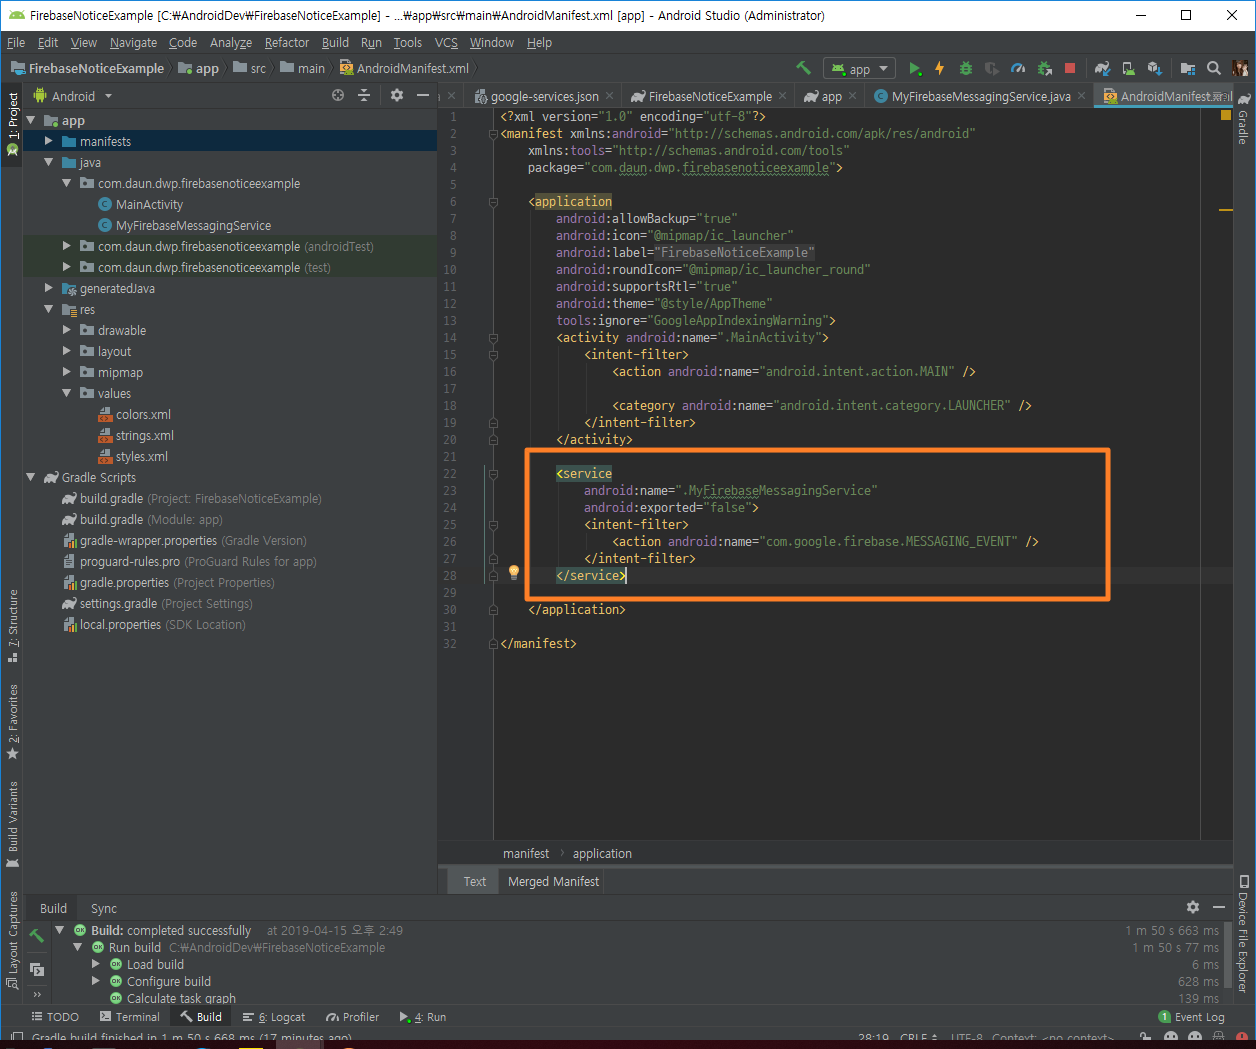
AndroidMenifest.xml 파일 수정 후 앱 실행
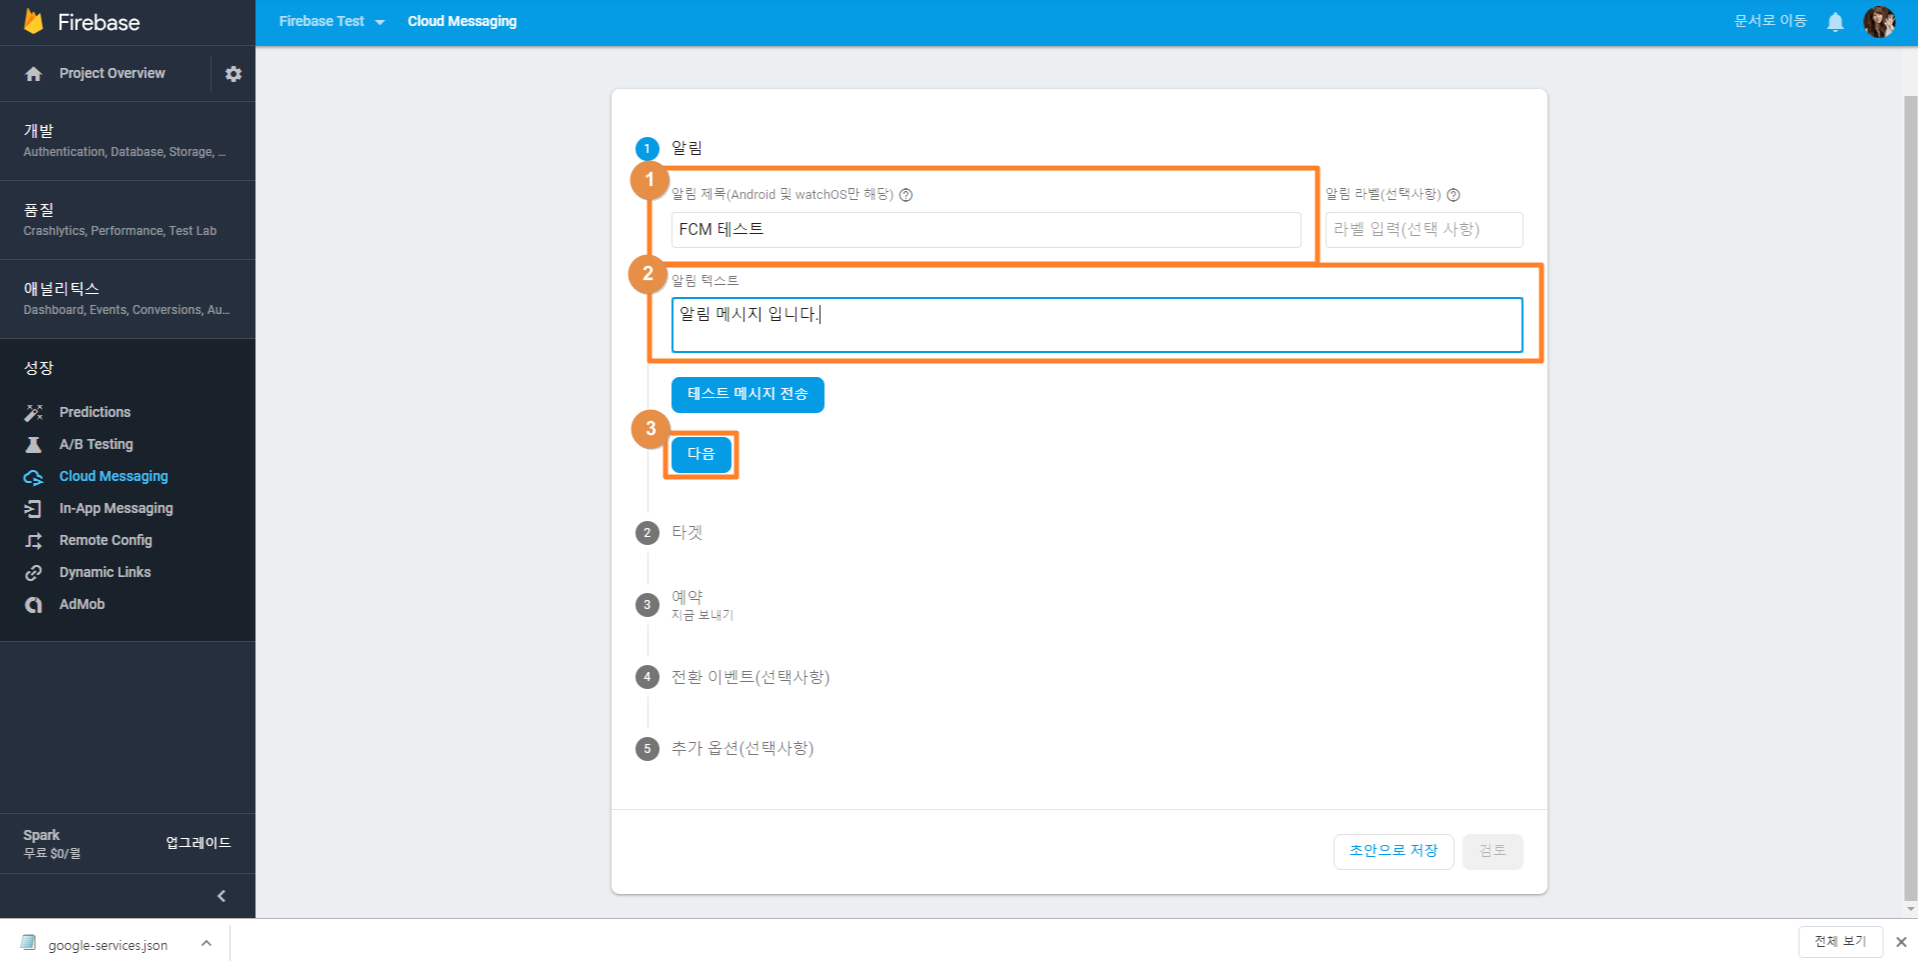
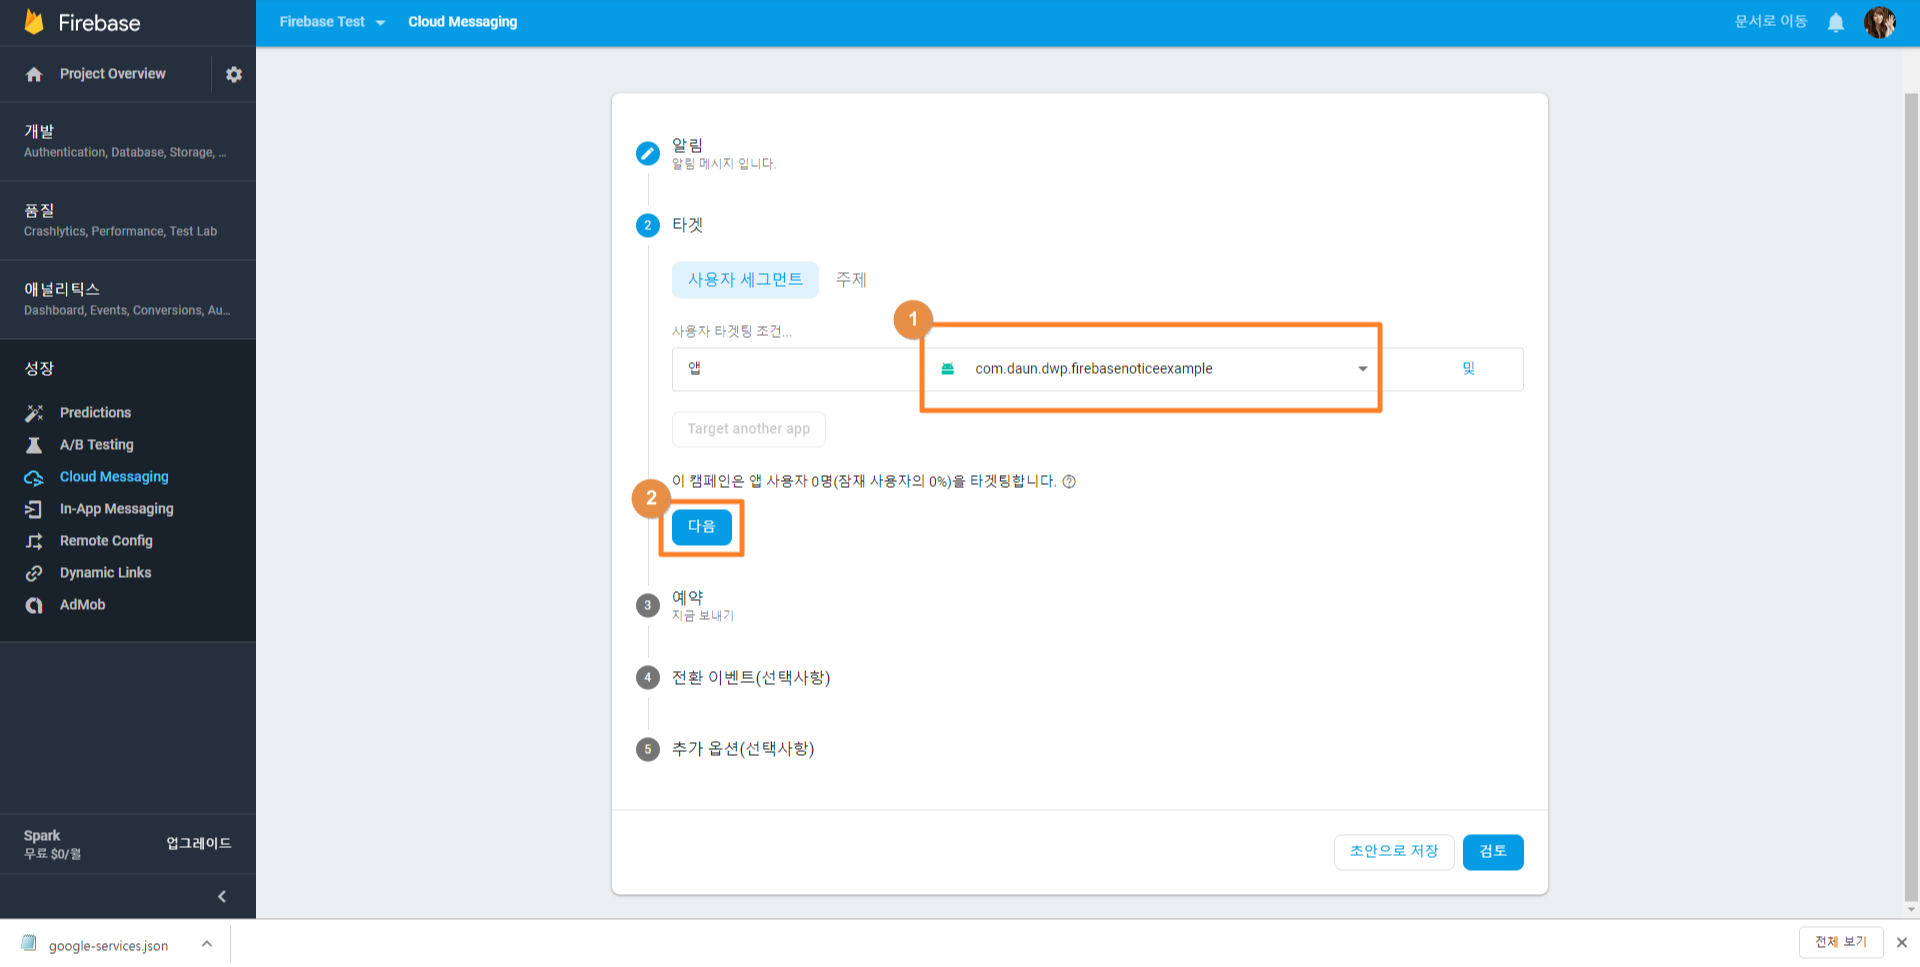
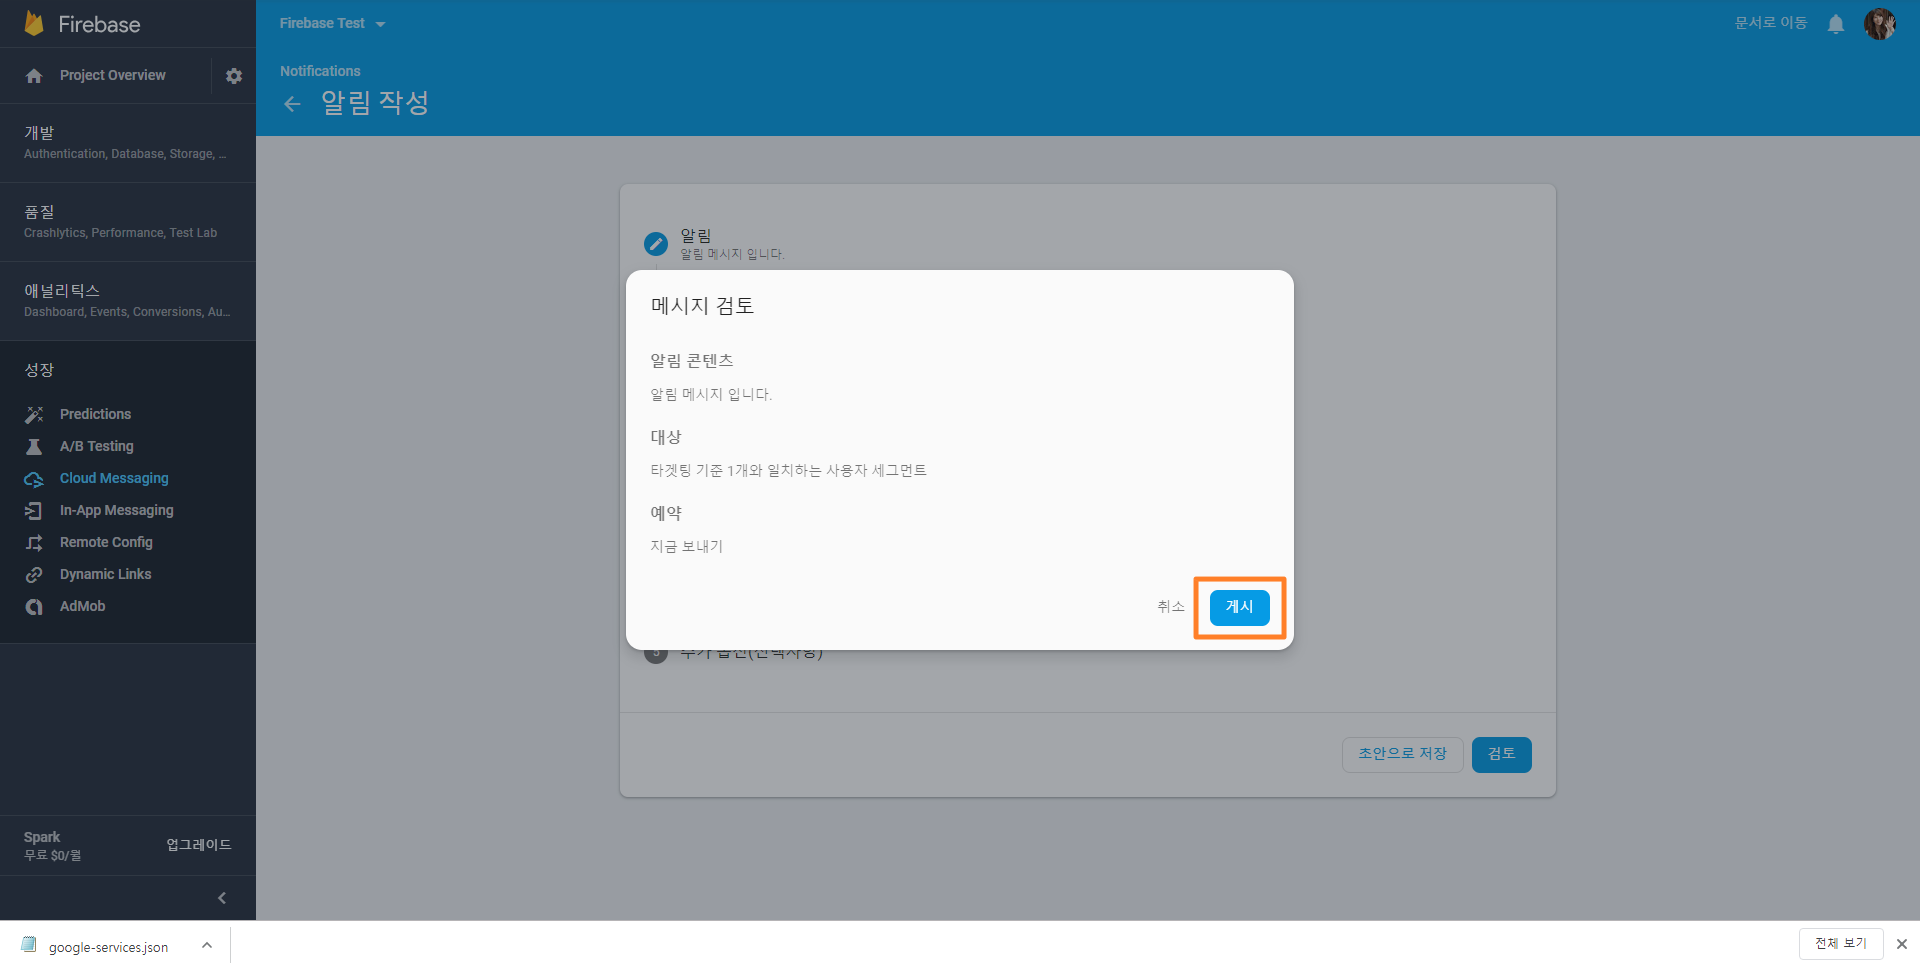
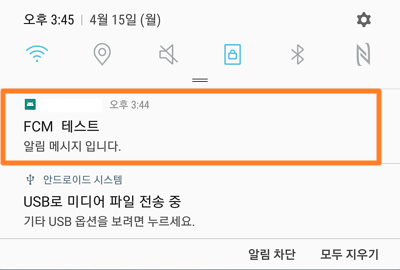
3. 알림 메시지 전송 테스트
알림이 오는지 테스트
밑의 '전환 이벤트', '추가 옵션'은 선택 사항임
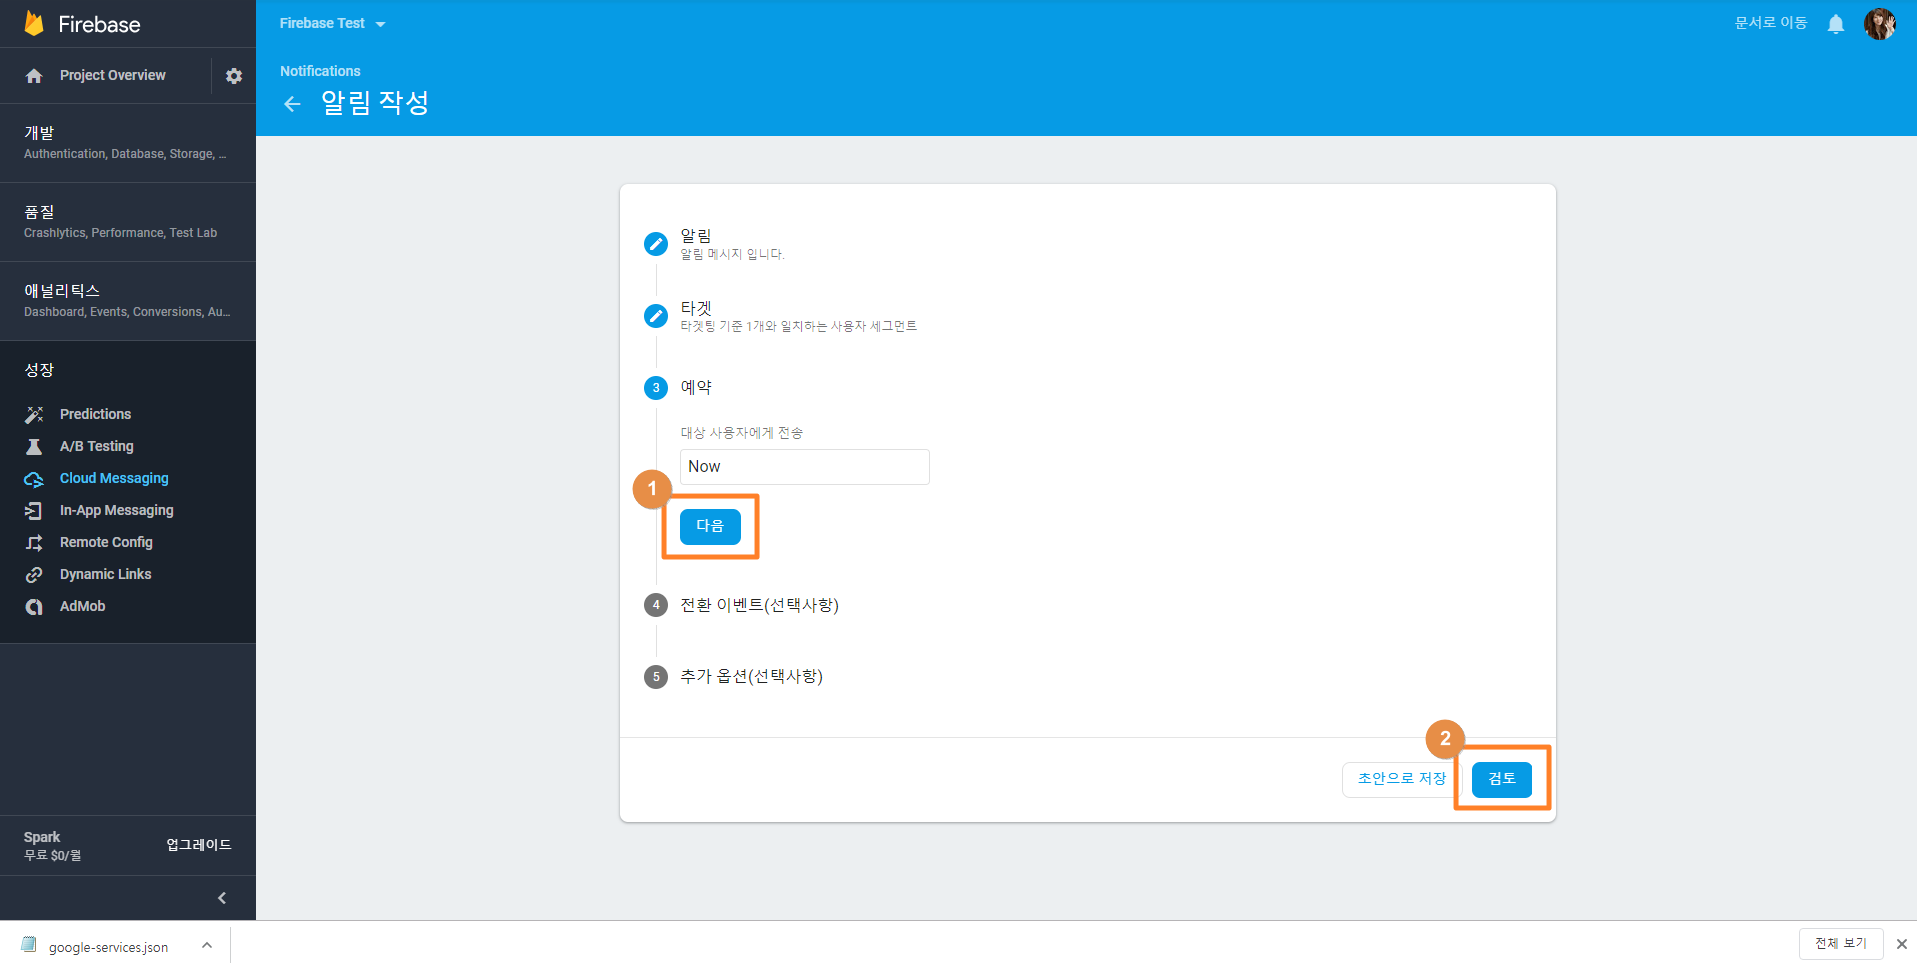
밑의 '전환 이벤트', '추가 옵션'은 선택 사항임
※ 추가 1 - 앱이 Foreground 상태일 때, 알림 메시지 받기
MyFirebaseMessagingService.java 안에서 다음의 함수를 추가한다.
...
} else {
            Map<String, String> mapMessage = new HashMap<>();
            assert getMessage != null;
            mapMessage.put("key", getMessage );

            // 앱이 포어그라운드 상태에서도 알림 창을 받으려면 다음을 주석 해제
            sendNotification(mapMessage); // <------- 요녀석 추가

			// Broadcast Data Sending Test
            Intent intent = new Intent("alert_data");
            intent.putExtra("msg", getMessage);
            LocalBroadcastManager.getInstance(this).sendBroadcast(intent);
        }
    }
}
...
private void sendNotification(Map<String, String> data){
        int noti_id = 1;
        String getMessage = "";

        Intent intent = new Intent(this, MainActivity.class);
        intent.addFlags(Intent.FLAG_ACTIVITY_CLEAR_TOP);
        intent.addFlags(Intent.FLAG_ACTIVITY_SINGLE_TOP);

        intent.putExtra("notification_id", 0);
        // Push로 받은 데이터를 그대로 다시 intent에 넣어준다.
        if (data != null && data.size() >0) {
            for(String key : data.keySet()){
                getMessage = data.get(key);
                intent.putExtra(key, getMessage);
            }
        }

        PendingIntent pendingIntent = PendingIntent.getActivity(this, 0
                , intent, PendingIntent.FLAG_ONE_SHOT);

        String channelId = getString(R.string.default_notification_channel_id);
        Uri defaultSoundUri = RingtoneManager.getDefaultUri(RingtoneManager.TYPE_NOTIFICATION);
        NotificationCompat.Builder notificationBuilder = new NotificationCompat.Builder(this, channelId)
                .setSmallIcon(R.mipmap.ic_launcher)
                .setContentTitle("FCM Message Test !")
                .setContentText(getMessage)
                .setAutoCancel(true)
                .setSound(defaultSoundUri)
                .setContentIntent(pendingIntent);
        NotificationManager notificationManager = (NotificationManager)getSystemService(Context.NOTIFICATION_SERVICE);

        // Notification 채널을 설정합니다.
        if (Build.VERSION.SDK_INT >= Build.VERSION_CODES.O) {
            NotificationChannel channel = new NotificationChannel(channelId, "Channel human readable title", NotificationManager.IMPORTANCE_DEFAULT);
            notificationManager.createNotificationChannel(channel);
        }
        notificationManager.notify(noti_id, notificationBuilder.build());
}
그런데 앱이 Foreground 상태인데 알림창을 누르게 되면 앱이 재실행 된다.
이런 효과를 사용자에게 보이는 경우는 거의 없기 때문에 다음의 처리를 한다.
Service에서 MainActivity Intent할 때 FLAG 추가
intent.addFlags(Intent.FLAG_ACTIVITY_CLEAR_TOP);
intent.addFlags(Intent.FLAG_ACTIVITY_SINGLE_TOP);
알림을 눌렀을 때 의도한 Activity.java 파일에서 onNewIntent를 구현한다.
이렇게 하면 사용자가 알림 버튼을 눌렀을 때 onCreate()가 호출되지 않고 onNewIntent() 이후 onResume() 순서로 호출된다.
...
    /** 사용자가 앱 포어그라운드에서 알람창을 눌렀을 때 최초 호출 이후 --> onResume() **/
    @Override
    protected void onNewIntent(Intent intent) {
        super.onNewIntent(intent);
        Log.e(TAG, "onNewIntent() !");
        setIntent(intent);
    }

    @Override
    public void onResume() {
        super.onResume();
        Log.e(TAG, "onResume() !");
    }
...
참고로, 나의 경우에는 데이터를 받기 위해서 MyFirebaseMessagingService.java 에서 intent.putextra를 사용하고, 호출된 Activity.java의 onResume() 메소드에서 getExtras()를 사용해 받은 데이터를 처리했다.
그리고 onNewIntent()에서 setIntent(intent)를 넣어야 getExtras()할 때 NULL이 발생하지 않는다.
※ 추가 2 - HTTP Protocol을 사용해서 알림 메시지 보내기
Curl을 사용하든 Postman을 사용하든 HTTP 프로토콜 메시지를 보낼 수 있으면 된다.
Method#URL :
POST#https://fcm.googleapis.com/fcm/send
Header :
Content-Type : application/json
Authorization : key={프로젝트 키}
Body :
{
"priority" : "high",
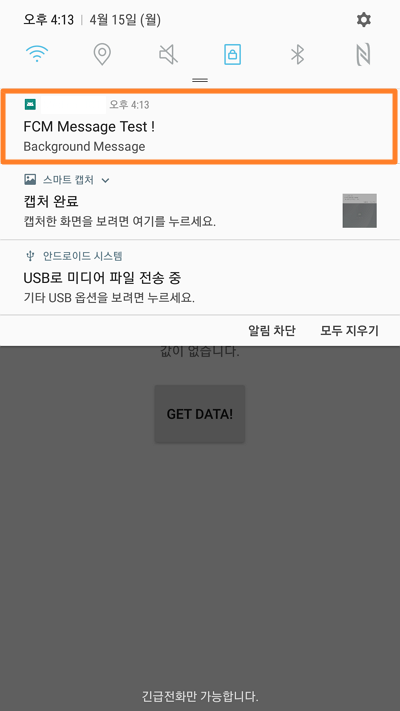
"notification" : {
"body" : "Background Message",
"title" : "BG Title",
"click_action" : "OpenSub"
},
"data" : {
"title" : "FG Title",
"message" : "Message"
},
"registration_ids": ["{device1}"]
}
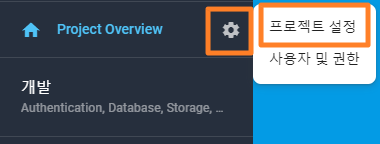
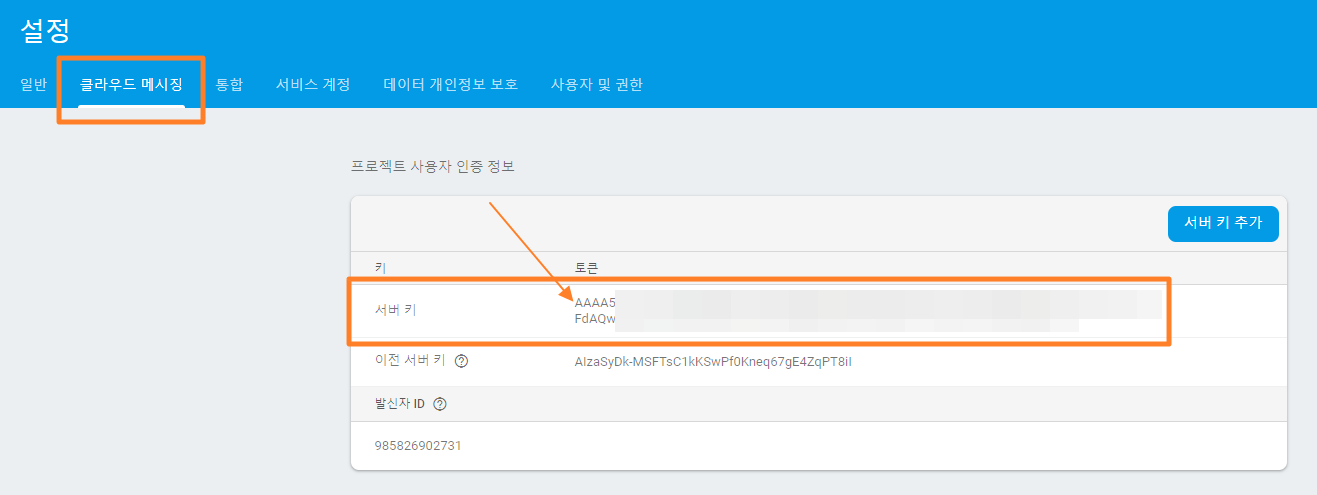
Header의 프로젝트 키 값은 Firebase Console에서 확인할 수 있다.
registration_ids 값에는 token 값을 넣어서 특정한 여러 또는 단일 디바이스로만 알림을 날릴 수 있다.
※ 추가 3 - 앱이 Background 상태일 때, 알림 메시지를 누르면 원하는 Activity로 가기
Foreground의 경우에는 알림이 오면 MyFirebaseMessagingServcie.java 의 onMessageReceived() 함수가 요청이 되어데이터 처리를 Activity까지 무난하게 흘릴 수 있는데, Background 상태에서는 알림이 오면 그렇지 않다. 관련 처리를 하기 위해서는 조금만 수정하면 된다.
1. AndroidManifest.xml 파일 수정
알림 창을 누르게 되면 의도한 화면(SubActivity)으로 가게하기 위해서 다음을 추가한다.
<activity android:name=".SubActivity">
<intent-filter>
<action android:name="OpenSub" />
<category android:name="android.intent.category.DEFAULT" />
</intent-filter>
</activity>
2. 알림 메시지 전송
알림 메시지를 전송할 때 'click_action' 을 추가한다.
{
"priority" : "high",
"notification" : {
"body" : "Background Message",
"title" : "BG Title",
"click_action" : "OpenSub"
},
"data" : {
"title" : "FG Title",
"message" : "Message"
},
"registration_ids": ["{device1}"]
}
3. 데이터 수신
데이터는 Intent를 사용하면 된다.